How to Quickly Check/Backup ESXi Host TPM Encryption Recovery Key Using PowerCLI

Managing encryption across multiple ESXi hosts can be a bit of a hassle. But don’t worry. I’ve got a simple PowerCLI script that’ll save you time and headaches by quickly retrieving encryption status and recovery keys from your VMware environment.

Why Do You Need This?

Ensuring your ESXi hosts are correctly encrypted is essential for security. Regular checks help prevent surprises later, especially during troubleshooting or audits.

Getting Started

First, make sure you’re connected to your vCenter:

Connect-VIServer -Server

Replace with your vCenter IP or FQDN.

The Script Breakdown

Here’s a quick rundown of the PowerCLI script to verify encryption settings across all ESXi hosts and who Recovery key for each ESXi host. (link to GitHub repository and file tpm_recovery_key_backup.ps1):

# Connect to your vCenter server (if not already connected)
# Connect-VIServer -Server <VCENTER_IP_OR_FQDN>

$esxis  = get-vmhost | Sort-Object

foreach ($esx in $esxis) {
    $key= @()
    $enc = @()
    if ($esx.ConnectionState -ne "Connected" -and $esx.ConnectionState -ne "Maintenance") {
        Write-Host ""
        Write-Host "================================================================================" -ForegroundColor Yellow
        Write-Host "🚫 SKIPPED HOST" -ForegroundColor Yellow
        Write-Host "Host                : $($esx.Name)" -ForegroundColor DarkYellow
        Write-Host "Reason              : Not powered on or disconnected." -ForegroundColor DarkYellow
        Write-Host "================================================================================" -ForegroundColor Yellow
        Write-Host ""
        continue
    }
    $esxcli = Get-EsxCli -VMHost $esx -V2
    try {
        $key = $esxcli.system.settings.encryption.recovery.list.Invoke()
        $enc =  $esxcli.system.settings.encryption.get.Invoke()

        Write-Host "================================================================================" -ForegroundColor DarkCyan
        Write-Host "πŸ”Ή ESXi Host        : $($esx.Name)" -ForegroundColor Cyan
        Write-Host "πŸ” Recovery ID      : $($key.RecoveryID)" -ForegroundColor Green
        Write-Host "πŸ—οΈ  Recovery Key     : $($key.Key)" -ForegroundColor Yellow
        Write-Host "πŸ”’ Encryption Mode  : $($enc.Mode)" -ForegroundColor Magenta
        Write-Host "================================================================================" -ForegroundColor DarkCyan
        Write-Host ""
    }
    catch {
        Write-Host ""
        Write-Host "================================================================================" -ForegroundColor DarkGray
        Write-Host "❌ ERROR for host    : $($esx.Name)" -ForegroundColor Red
        Write-Host "⚠️  Failed to get encryption key for $($esx.Name) ."
        Write-Host "🧨 Error details     : $_"
        Write-Host "================================================================================" -ForegroundColor DarkGray
        Write-Host ""
    }
}

What the Script Does

  • Connects to each ESXi host.
  • Checks if the host is Connected or in Maintenance mode.
  • Retrieves the Encryption Recovery ID and Key.
  • Shows the current encryption mode.
  • Gracefully handles hosts that are offline or disconnected, clearly indicating skipped or problematic hosts.
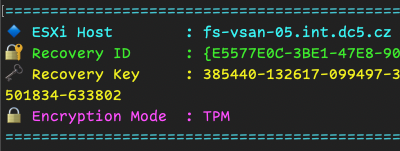
Output

Connected hosts or in Maintenance with Encryption keys

Powered off or disconnected hosts – Skipped hosts

Hosts without encryption keys or with errors

Wrapping It Up

This quick script helps you stay on top of ESXi encryption keys effortlessly. Just copy, adjust if needed, and run. Happy scripting!

Centralized ESXi Logs: Quick Guide to Syslog Configuration (WebUI & CLI)

Configuring syslog on your ESXi host is essential for centralized logging and efficient monitoring. Having your logs centrally managed simplifies troubleshooting and helps with compliance and security audits. Below you’ll find an easy-to-follow guide for setting up syslog both via the WebUI and CLI. Don’t forget to verify connectivity and regularly check your centralized logs for effective monitoring.

Configure Syslog Service (vmsyslogd) on ESXi for Remote Logging

1. Configure Syslog Using the vSphere Client

Log in to the vSphere Client and select your ESXi host.

  • Navigate to the Configure tab.
  • Under System, click on Advanced System Settings.
  • Click Edit to modify settings.
  • Filter for Syslog.global.logHost.
  • Enter your syslog server details in the format tcp://hostname:514 or udp://hostname:514 in my case udp://10.20.55.44:514 or with DNS name udp://syslog:514
  • Click OK to apply the changes.

2. Open Firewall Ports for Syslog Traffic

Enable Syslog in Firewall Rules:

  • Still under the Configure tab, go to Networking > Firewall > Ougoing connections.
  • Click EDIT….
  • Filter for syslog
  • Click on Checkboxand Click OK.
  • Now you should see “syslog” in outgoing firewall rules.

3. Verify Connectivity to the Syslog Server

Test Network Connection:

4. Configure Syslog Using ESXCLI Commands (CLI Method)

Set the Remote Syslog Server:

  • Open a console session to your ESXi host.
  • Execute:
esxcli system syslog config set --loghost='udp://syslog:514’

Apply the New Configuration:

esxcli system syslog reload

Check the syslog configuration

esxcli system syslog config get

Open Firewall Ports:

  • Enable the syslog firewall rule with:
esxcli network firewall ruleset set --ruleset-id=syslog --enabled=true

Refresh the firewall settings:

esxcli network firewall refresh

Check the ruleset

esxcli network firewall ruleset rule list | grep syslog

Tips & Tricks

  • Verify firewall rules to allow syslog traffic.
  • Use consistent naming conventions for easier log analysis.
  • Regularly backup your syslog configuration settings.

By following these simple steps and best practices, you’ll ensure your ESXi host remains efficiently monitored, secure, and compliant.

VMware related KB 318939: https://knowledge.broadcom.com/external/article/318939/

How to Quickly Disable a vmnic on ESXi – No Switch Changes or Cable Pulling Needed!

In VMware ESXi, managing physical network interfaces (vmnics) is essential for troubleshooting, maintenance, or reconfiguration. There are times when you need to disable or re-enable a network interface without relying on the network team to shut down a switch port or physically unplugging the cable in the server room. Fortunately, this can be done quickly using the esxcli command-line tool.

Checking Available Network Interfaces

First login via SSH or directly on server console.

Before shutting down a vmnic, it’s good practice to list all available interfaces and check their status:

esxcli network nic list

This command will display a list of vmnics along with their link state, driver, and speed.

Shutting Down a vmnic Interface

To disable a specific vmnic, use the following command:

esxcli network nic down -n vmnicX
esxcli network nic down -n vmnic

Replace vmnicX with the actual interface name (e.g., vmnic5).

Bringing a vmnic Interface Back Up

If you need to enable the interface again, run:

esxcli network nic up -n vmnicX

This will bring the network interface back online.

esxcli network nic up -n vmnic

Use Cases

  • Test network failover scenarios.
  • Identify and isolate network issues by disabling a suspected faulty NIC.
  • Temporarily disable a NIC to measure the impact on network performance and verify load balancing efficiency.
  • Test how virtual machines respond when a specific network path goes down.
  • Shut down a vmnic that is connected to an untrusted VLAN or an incorrectly configured network.
  • Test different network configurations without permanently altering physical connections.

By using esxcli, you can manage network interfaces efficiently.


Let me know if you need any tweaks! πŸš€

How to Change vmnic Name on an ESXi Host via Command Line

Renaming or reordering vmnics on an ESXi host can be useful in various scenarios, such as standardizing network configurations or aligning network interface names across multiple hosts. This guide will show you how to achieve this using the ESXi command line.

Listing Current vmnic Aliases

Before making changes, it is essential to check the current vmnic assignments. You can do this with the following command:

localcli --plugin-dir /usr/lib/vmware/esxcli/int/ deviceInternal alias list

This command will return a list of all existing vmnic aliases and their corresponding bus addresses.

Bus type  Bus address          Alias
--------  -------------------  -----
pci       m01000300            vmhba0
pci       m01000b00            vmnic0
pci       p0000:00:07.1        vmhba1
pci       m02001300            vmnic1
logical   pci#m01000300#0      vmhba0
logical   pci#p0000:00:07.1#0  vmhba1
logical   pci#p0000:00:07.1#1  vmhba64
logical   pci#m02001300#0      vmnic1
logical   pci#m01000b00#0      vmnic0

When a nic is controlled by a native driver, then there are actually two aliases associated with the device: a pci alias for the pci device and a logical alias for the uplink logical device.

[root@fs-vsan-05:~] localcli --plugin-dir /usr/lib/vmware/esxcli/int deviceInternal alias list | grep vmnic1

pci m02001300 vmnic1
logical pci#m02001300#0 vmnic1

When the logical alias is present, then both the pci alias and logical alias need to be renamed !

Changing a vmnic Name

Make sure you have console access before starting the upcoming steps.

To change the name of a specific vmnic, use the following commands. Replace vmnic5 with the desired new alias and update the bus-address accordingly.

localcli --plugin-dir /usr/lib/vmware/esxcli/int deviceInternal alias store --bus-type pci --alias vmnic5 --bus-address m02001300

localcli --plugin-dir /usr/lib/vmware/esxcli/int deviceInternal alias store --bus-type logical --alias vmnic5 --bus-address pci#m02001300#0

Once the commands have been executed, you need to reboot the ESXi host for the changes to take effect.

reboot

Having Some Fun with vmnic Naming

If you want to experiment and see how ESXi handles long vmnic names, you can try something fun like this:

localcli --plugin-dir /usr/lib/vmware/esxcli/int deviceInternal alias store --bus-type pci --alias vmnic1234567890 --bus-address m02001300

localcli --plugin-dir /usr/lib/vmware/esxcli/int deviceInternal alias store --bus-type logical --alias vmnic1234567890 --bus-address pci#m02001300#0

reboot

While ESXi generally follows a strict naming convention, pushing its limits can be an interesting experiment!

Conclusion

Renaming vmnics in ESXi via the command line is a straightforward process that requires just a few commands and a reboot. Whether you’re restructuring network configurations or just having a bit of fun, these steps will help you modify your ESXi network interfaces with ease.

Related KB: https://knowledge.broadcom.com/external/article/324534/

2nd NIC for my NUC

Intel NUC is the best piece of HW for HOME mini-LAB. But once you start grow you need more network bandwith. And one pNIC is not enough. After few sec of googling I find great page DevTTY. Where is a lot of information about “supported” USB NIC for your Intel NUC. I choose TP-LINK UE300 because I had a couple of TP-LINK (3210, 5426) switches and they are doing great job.

So I ordered TP-LINK UE300 USB 3.0 network card. Once it was delivered to me, I connected it to the NUC. Then download the driver from DevTTY and upload it to one of my datastore.  No maintenance, reboot is needed. The only thing you need to do is to change the “Host Image Profile Acceptance Level”  to  “Community supported”.

Host Image Profile Acceptance Level-Community

Then just log in to the ESXi console and install VIB file with command:

Continue reading “2nd NIC for my NUC”