Cybersecurity threats, especially ransomware, are constantly evolving, so it’s important to regularly audit your ESXi hosts to ensure they have the proper protections enabled. Today I want to share a simple but effective PowerCLI script, Get-RansomwareProtectionStatus, that quickly checks your VMware hosts for important ransomware-related security configurations.
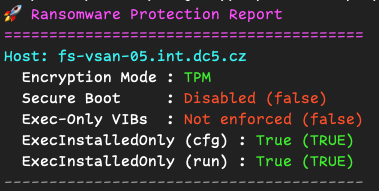
🚀 What This Script Does This script focuses on three key settings that enhance protection against ransomware on your ESXi hosts:
Encryption Mode: Checks whether TPM-based encryption is active.
Secure Boot Enforcement: Confirms Secure Boot is enabled.
Exec-Installed-Only Mode (Configured & Runtime): Ensures only binaries from installed VMware VIB packages can execute.
Having these settings properly configured greatly reduces the risk of unauthorized code execution—exactly what you want to fight ransomware!
🔧 How to Use the Script
Here’s how simple it is. First connect to your vCenter and then run a script.
.\Get-RansomwareProtectionStatus.ps1 <HOST>
It generates a clear, colored summary, instantly telling you what’s secure and what needs your attention.
You can integrate this script into your monitoring routines, run it on multiple hosts with automation tools like Ansible Semaphore or GitLab CI, or even schedule regular audits.
⚡ Pro Tip: Save your reports to a file or push results directly to your monitoring dashboard to track security over time!
📦 Get the Script
Check out the script in my GitHub repo [link here] and let me know your thoughts! Direct link to script [here]
Feel free to comment or ping me on social media if you’ve enhanced it further or found a creative use case. Stay secure! 🛡️
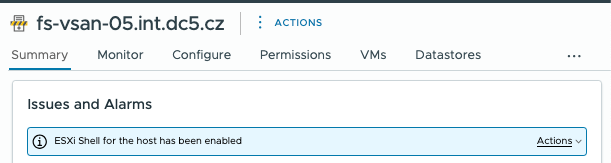
If you’re managing VMware environments, you might occasionally run into persistent shell warning alerts in your ESXi hosts. Thankfully, you can quickly find and suppress these warnings with a bit of PowerCLI magic.
Check for ESXi Hosts with Shell Warnings
Show the actual advanced settings on all hosts. Log into vCenter using PowerCLI and run this command:
This command immediately disables the shell warnings on selected hosts. No more alerts in GUI!
Command output:
Entity                Name                          Value
------                ----                          -----
fs-vsan-05.int.dc5.cz UserVars.SuppressShellWarning     1
Why (Not) Suppress Shell Warnings?
It’s important to note that suppressing shell warnings is only advisable in lab or non-production environments. In production environments, shell warnings provide valuable security reminders. Always keep shell warnings enabled to maintain security awareness unless you’re working in a controlled test environment.
Configuring syslog on your ESXi host is essential for centralized logging and efficient monitoring. Having your logs centrally managed simplifies troubleshooting and helps with compliance and security audits. Below you’ll find an easy-to-follow guide for setting up syslog both via the WebUI and CLI. Don’t forget to verify connectivity and regularly check your centralized logs for effective monitoring.
Configure Syslog Service (vmsyslogd) on ESXi for Remote Logging
1. Configure Syslog Using the vSphere Client
Log in to the vSphere Client and select your ESXi host.
Navigate to the Configure tab.
Under System, click on Advanced System Settings.
Click Edit to modify settings.
Filter for Syslog.global.logHost.
Enter your syslog server details in the format tcp://hostname:514 or udp://hostname:514 in my case udp://10.20.55.44:514 or with DNS name udp://syslog:514
Click OK to apply the changes.
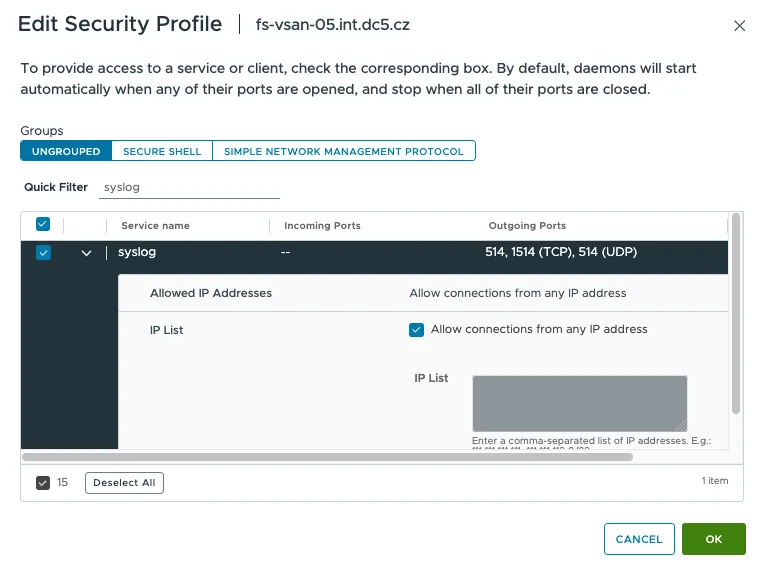
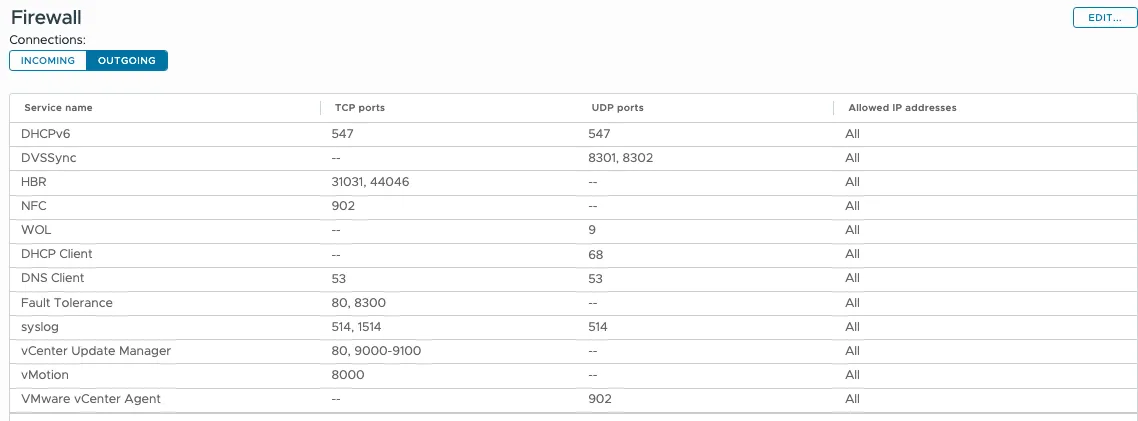
2. Open Firewall Ports for Syslog Traffic
Enable Syslog in Firewall Rules:
Still under the Configure tab, go to Networking > Firewall > Ougoing connections.
Click EDIT….
Filter for syslog
Click on Checkboxand Click OK.
Now you should see “syslog” in outgoing firewall rules.
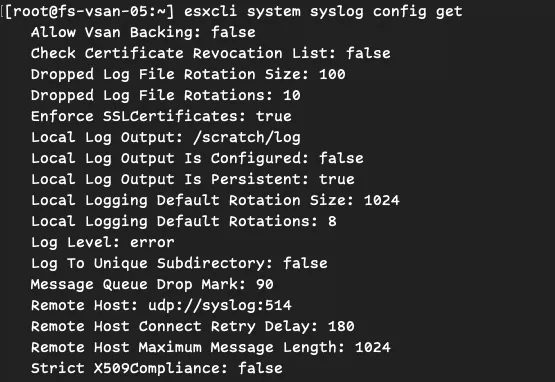
3. Verify Connectivity to the Syslog Server
Test Network Connection:
Access the ESXi Shell or use SSH to connect to your ESXi host.
In VMware ESXi, managing physical network interfaces (vmnics) is essential for troubleshooting, maintenance, or reconfiguration. There are times when you need to disable or re-enable a network interface without relying on the network team to shut down a switch port or physically unplugging the cable in the server room. Fortunately, this can be done quickly using the esxcli command-line tool.
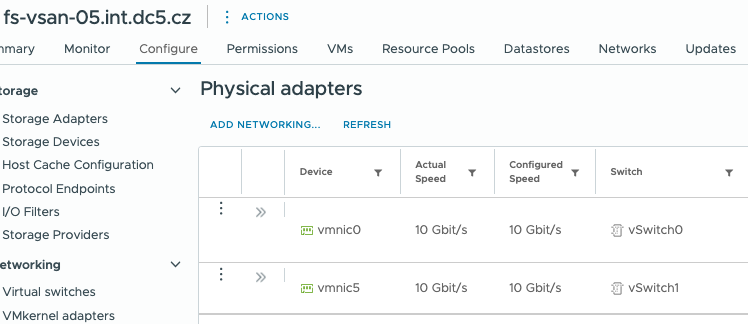
Checking Available Network Interfaces
First login via SSH or directly on server console.
Before shutting down a vmnic, it’s good practice to list all available interfaces and check their status:
esxcli network nic list
This command will display a list of vmnics along with their link state, driver, and speed.
Shutting Down a vmnic Interface
To disable a specific vmnic, use the following command:
esxcli network nic down -n vmnicX
Replace vmnicX with the actual interface name (e.g., vmnic5).
Bringing a vmnic Interface Back Up
If you need to enable the interface again, run:
esxcli network nic up -n vmnicX
This will bring the network interface back online.
Use Cases
Test network failover scenarios.
Identify and isolate network issues by disabling a suspected faulty NIC.
Temporarily disable a NIC to measure the impact on network performance and verify load balancing efficiency.
Test how virtual machines respond when a specific network path goes down.
Shut down a vmnic that is connected to an untrusted VLAN or an incorrectly configured network.
Test different network configurations without permanently altering physical connections.
By using esxcli, you can manage network interfaces efficiently.
Renaming or reordering vmnics on an ESXi host can be useful in various scenarios, such as standardizing network configurations or aligning network interface names across multiple hosts. This guide will show you how to achieve this using the ESXi command line.
Listing Current vmnic Aliases
Before making changes, it is essential to check the current vmnic assignments. You can do this with the following command:
localcli --plugin-dir /usr/lib/vmware/esxcli/int/ deviceInternal alias list
This command will return a list of all existing vmnic aliases and their corresponding bus addresses.
Bus type  Bus address          Alias
--------  -------------------  -----
pci       m01000300            vmhba0
pci       m01000b00            vmnic0
pci       p0000:00:07.1        vmhba1
pci       m02001300            vmnic1
logical   pci#m01000300#0      vmhba0
logical   pci#p0000:00:07.1#0  vmhba1
logical   pci#p0000:00:07.1#1  vmhba64
logical   pci#m02001300#0      vmnic1
logical   pci#m01000b00#0      vmnic0
When a nic is controlled by a native driver, then there are actually two aliases associated with the device: a pci alias for the pci device and a logical alias for the uplink logical device.
[root@fs-vsan-05:~] localcli --plugin-dir /usr/lib/vmware/esxcli/int deviceInternal alias list | grep vmnic1
When the logical alias is present, then both the pci alias and logical alias need to be renamed !
Changing a vmnic Name
Make sure you have console access before starting the upcoming steps.
To change the name of a specific vmnic, use the following commands. Replace vmnic5 with the desired new alias and update the bus-address accordingly.
localcli --plugin-dir /usr/lib/vmware/esxcli/int deviceInternal alias store --bus-type pci --alias vmnic5 --bus-address m02001300

localcli --plugin-dir /usr/lib/vmware/esxcli/int deviceInternal alias store --bus-type logical --alias vmnic5 --bus-address pci#m02001300#0
Once the commands have been executed, you need to reboot the ESXi host for the changes to take effect.
reboot
Having Some Fun with vmnic Naming
If you want to experiment and see how ESXi handles long vmnic names, you can try something fun like this:
localcli --plugin-dir /usr/lib/vmware/esxcli/int deviceInternal alias store --bus-type pci --alias vmnic1234567890 --bus-address m02001300

localcli --plugin-dir /usr/lib/vmware/esxcli/int deviceInternal alias store --bus-type logical --alias vmnic1234567890 --bus-address pci#m02001300#0

reboot
While ESXi generally follows a strict naming convention, pushing its limits can be an interesting experiment!
Conclusion
Renaming vmnics in ESXi via the command line is a straightforward process that requires just a few commands and a reboot. Whether you’re restructuring network configurations or just having a bit of fun, these steps will help you modify your ESXi network interfaces with ease.
Ever wanted to spruce up that default login screen on your ESXi host or have some fun with your DCUI? Then you’re in the right place! In this post, I’ll walk through using the Annotations.WelcomeMessage advanced setting to display a custom welcome message on your ESXi host. Best of all, I’ll share a neat PowerShell function to make it easy.
Why Customize the Welcome Message?
Personalization: Display a personal greeting, instructions, or a quick reminder for anyone logging into the ESXi console.
Useful Info: Share contact details or support info in case someone needs to know who to call if something breaks.
Fun Factor: It’s always nice to see something other than “Welcome to VMware ESXi” from time to time at least in homelab.
Security: Display security/legal warning.
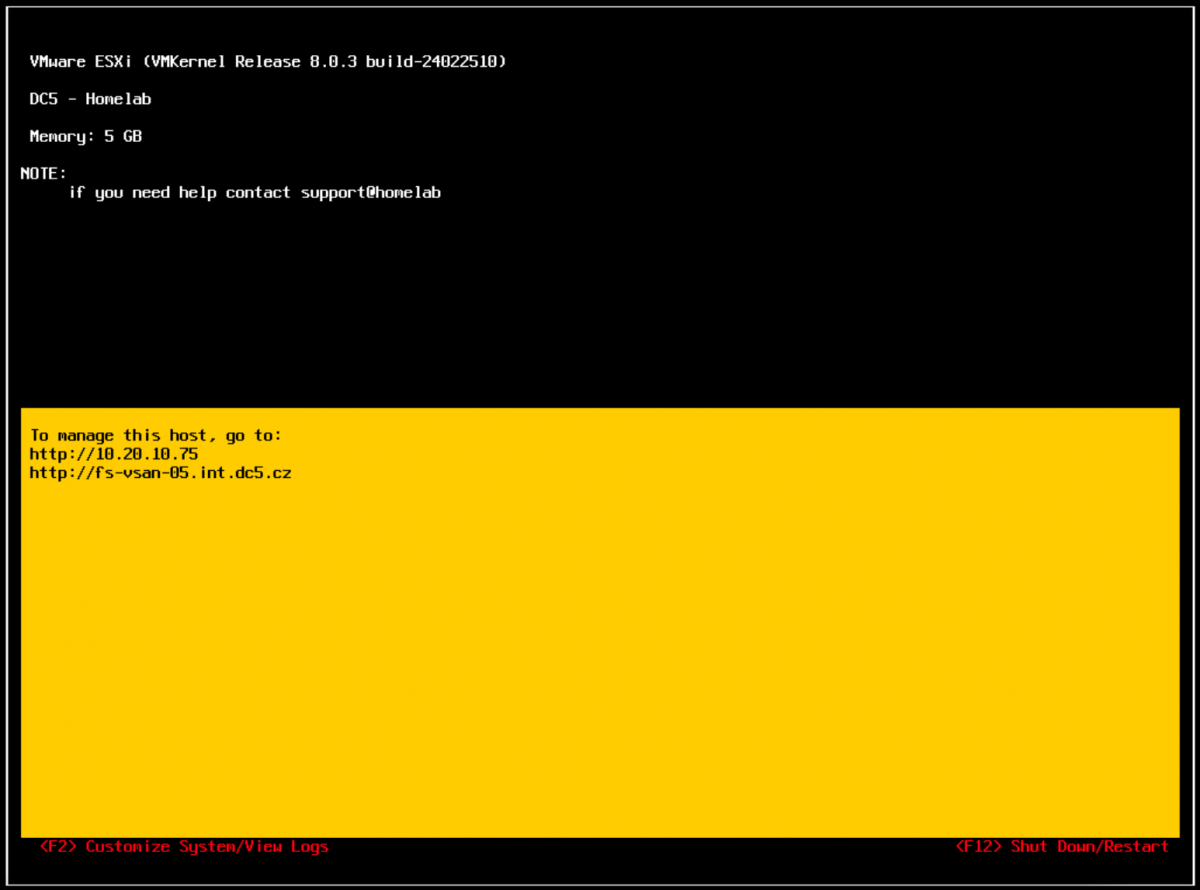
The Advanced Setting: Annotations.WelcomeMessage
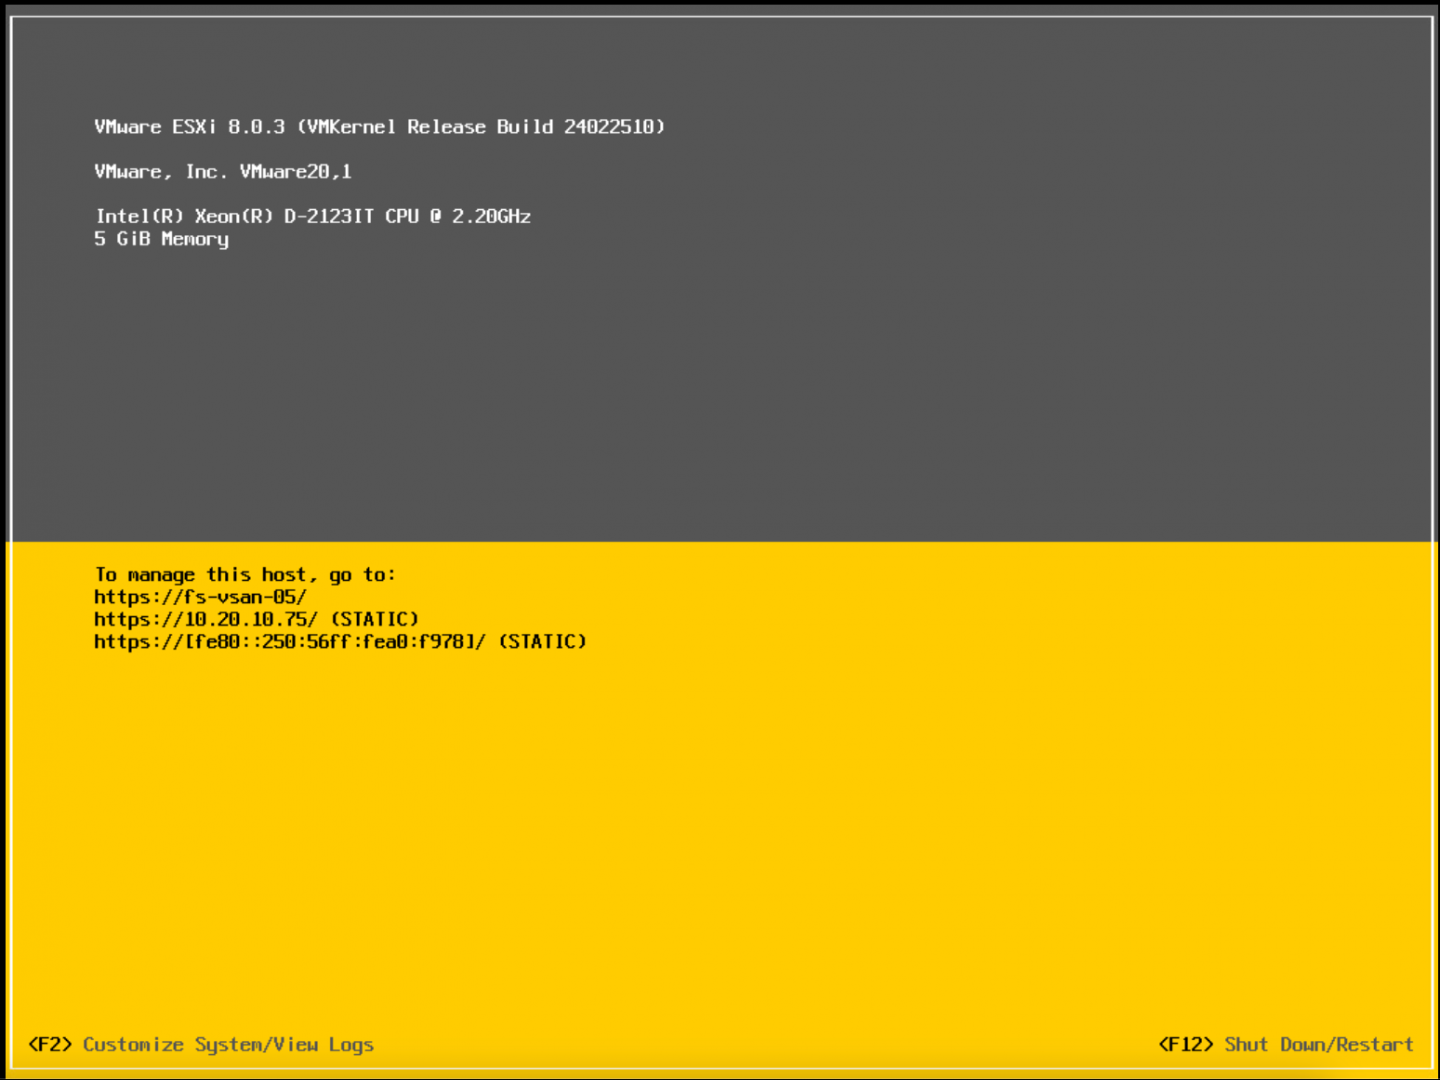
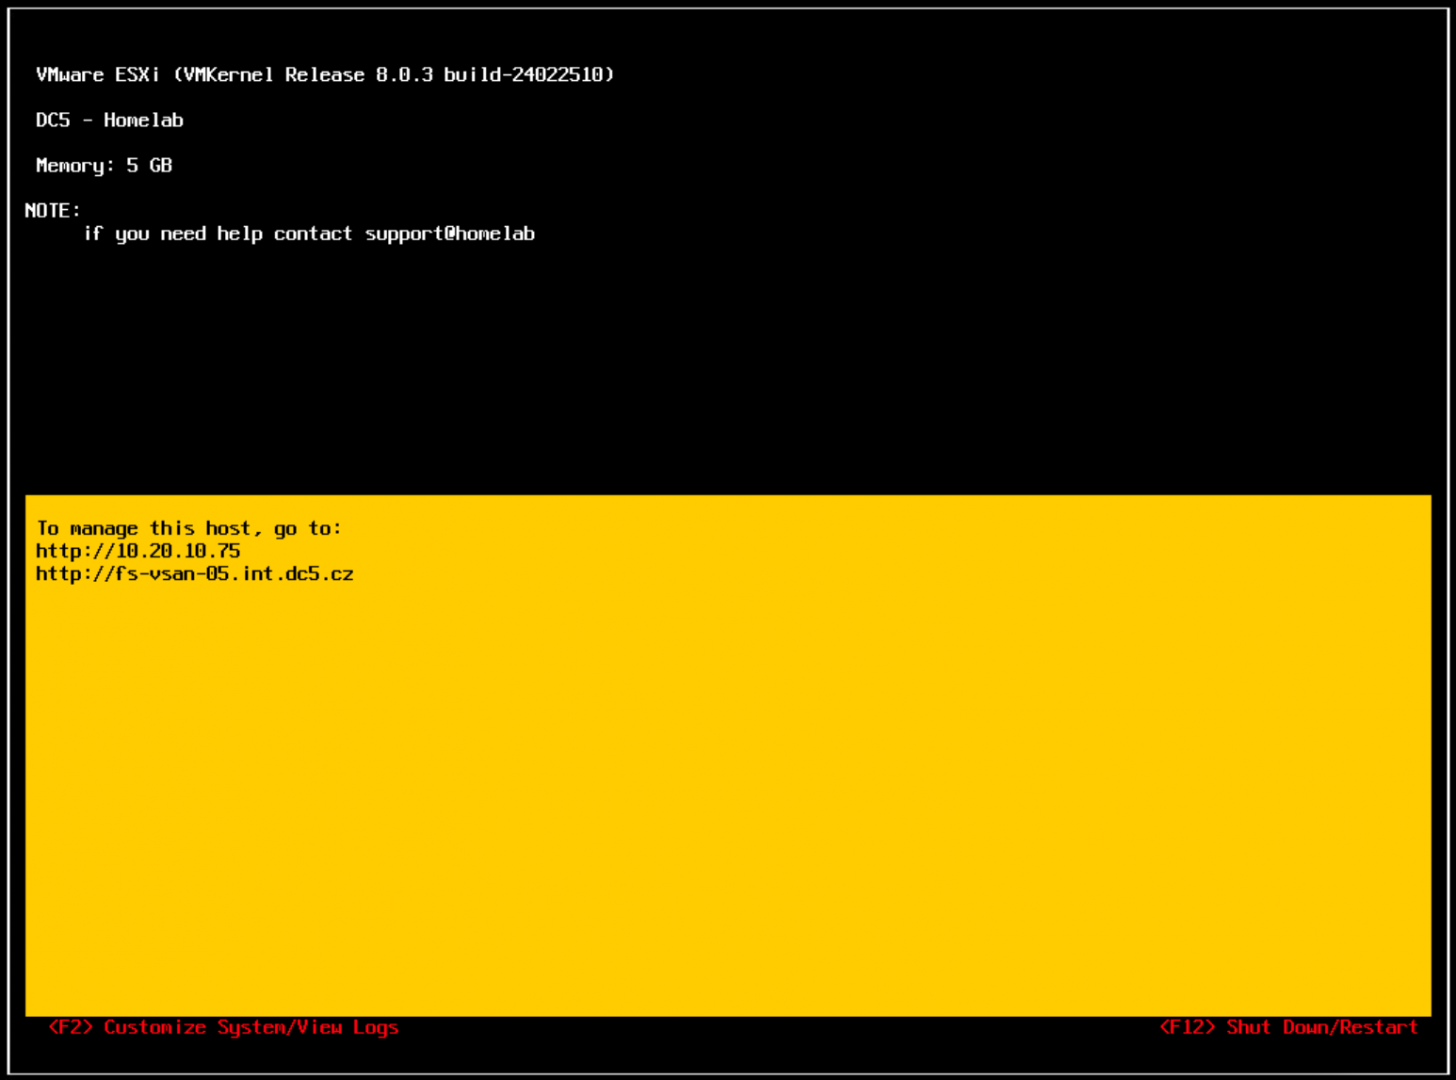
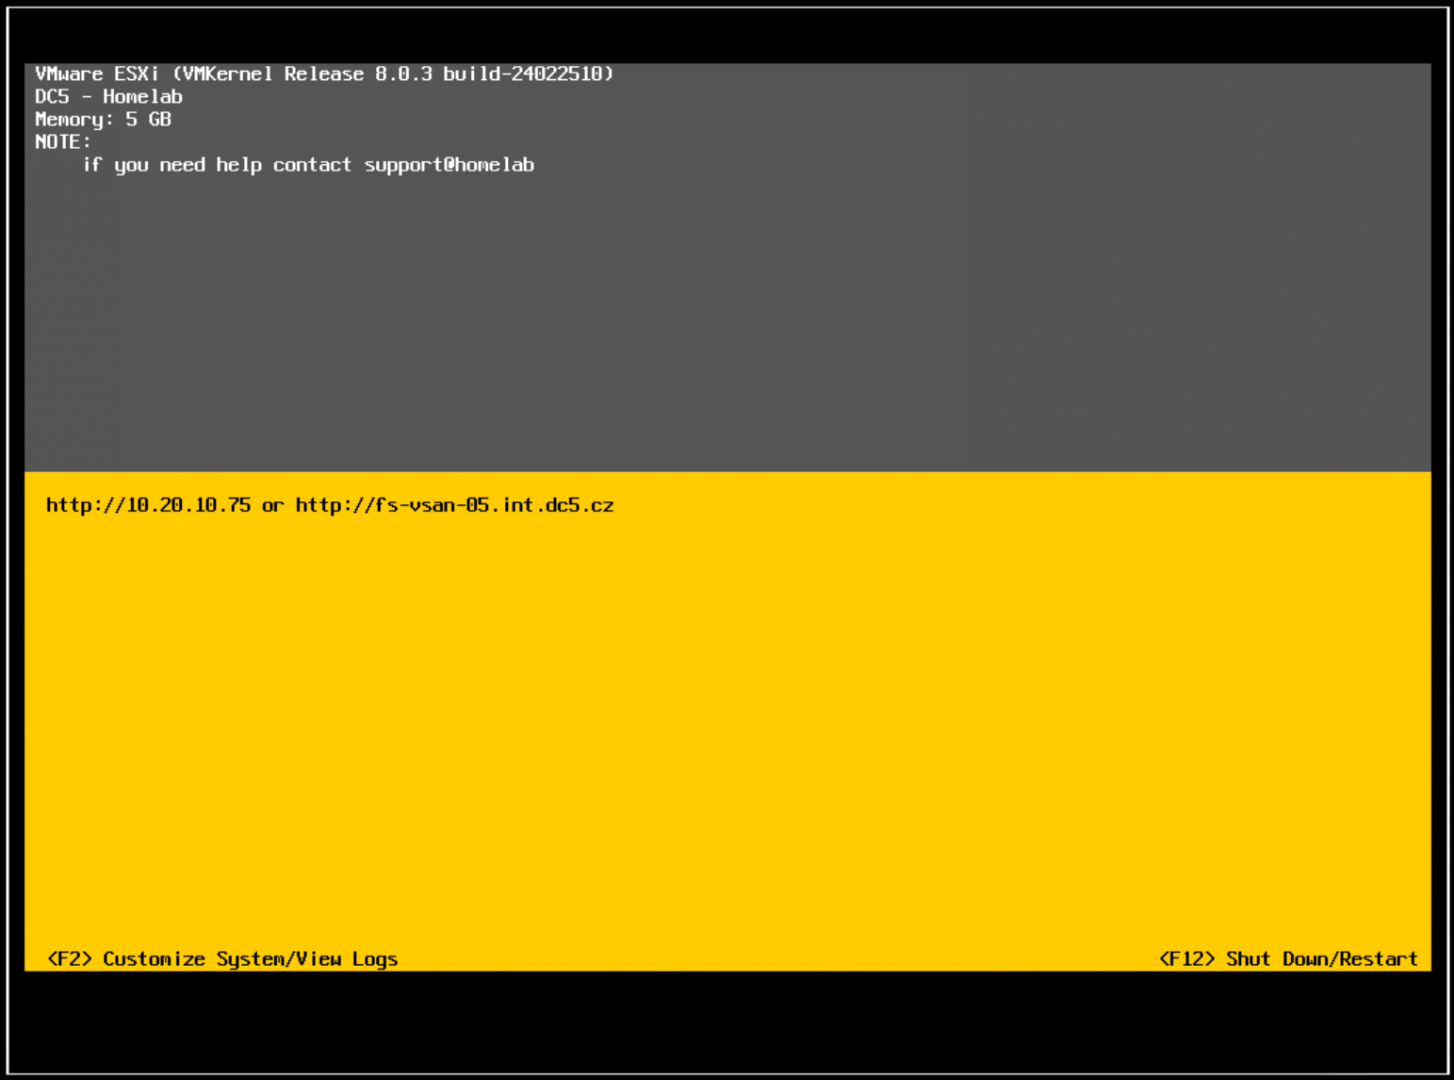
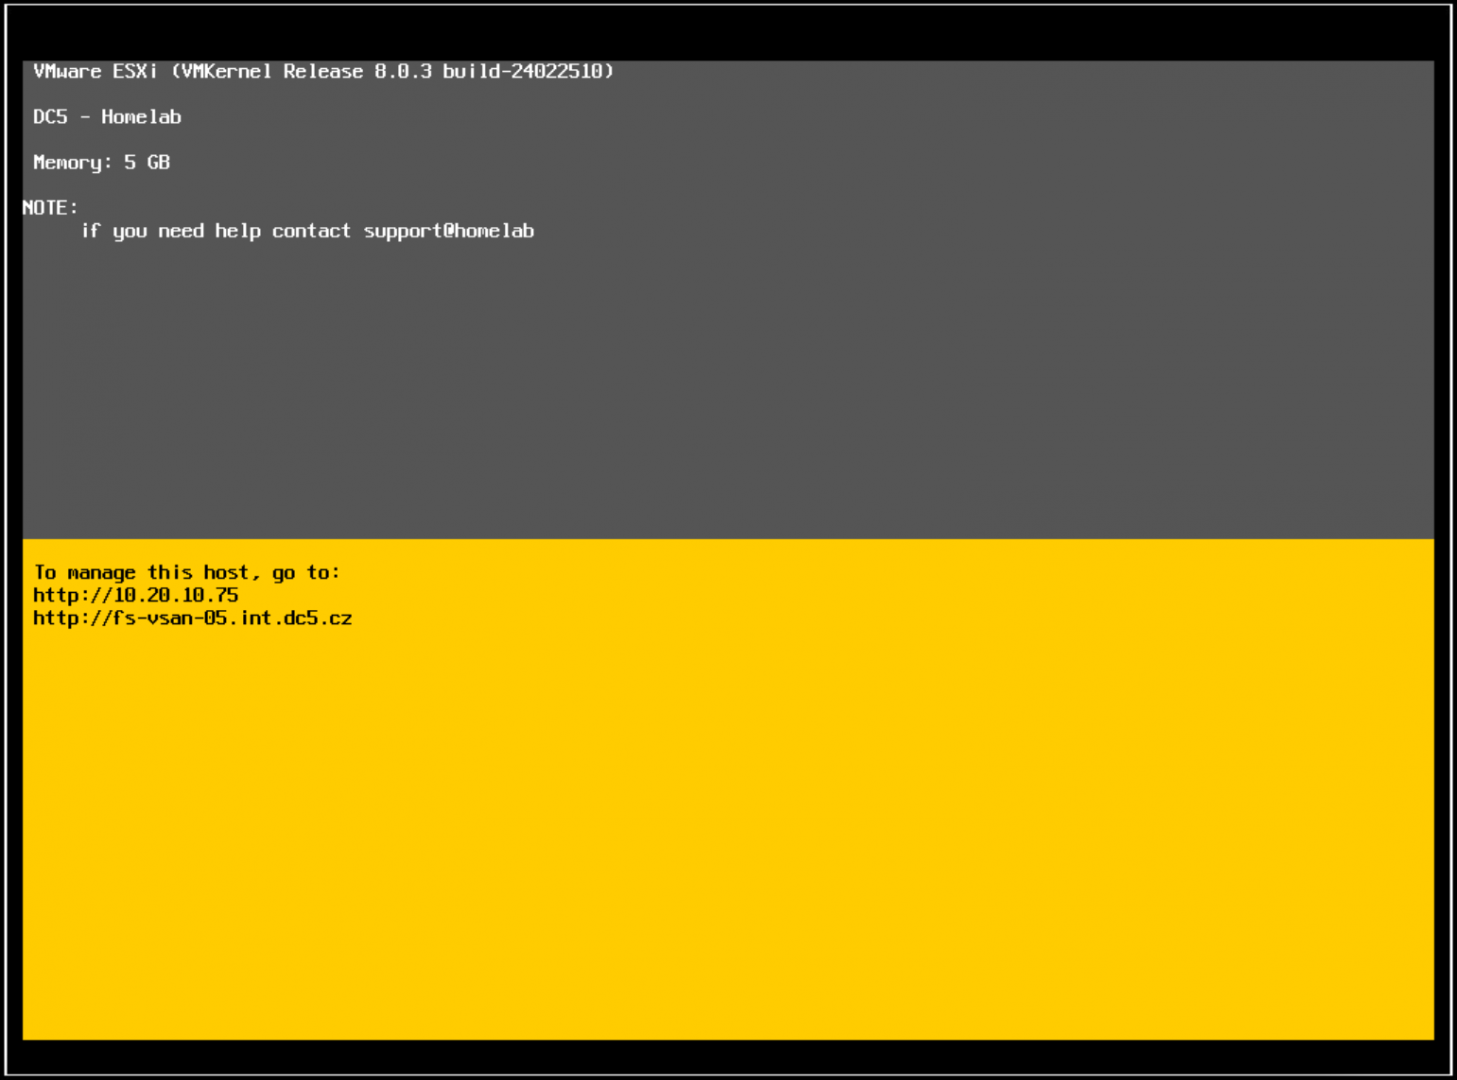
Annotations.WelcomeMessage is an advanced ESXi host parameter. It’s where you store the text you want displayed in DCUI on the default console screen (replacing some default text, similar to screenshot below).
(virtual ESXi)
PowerShell Script: Set-WelcomeMessage Function
Here is the star of the show—my simple PowerShell function that taps into VMware’s PowerCLI to set Annotations.WelcomeMessage on your ESXi host. It even shows you the old message before setting the new one.
Function Set-WelcomeMessage {
    <#
        .SYNOPSIS
        This function retrieves the vCenter version and build number.
        Based on https://knowledge.broadcom.com/external/article/315410/

        .NOTES
        File Name      : set_welcome_message.ps1
        Author         : Stanislav Musil
        Prerequisite   : PowerShell
        Website        : https://vpxd.dc5.cz/index.php/category/blog/
        X (Twitter)    : https://www.x.com/stmusil

        .DESCRIPTION
        The script is a function that takes a single parameter, the vCenter server name. Retrieves the version and build number.
        To use the function, you can dot-source the script and then call the function.
        Windows:   . .\set_welcome_message.ps1
        Mac/Linux: . ./set_welcome_message.ps1

        .EXAMPLE
        Set-WelcomeMessage -Hostname "ESXi.example.com" -WelcomeMessage "Welcome to {{hostname}"

    #>
    param (
        [string]$HostName,
        [string]$WelcomeMessage
    )

    # Ensure PowerCLI module is imported
    if (-not (Get-Module -Name VMware.VimAutomation.Core -ErrorAction SilentlyContinue)) {
        Import-Module VMware.VimAutomation.Core
    }`

# Define the target host and the parameter values
$ESXihost = Get-VMHost -Name $HostName
$paramName = "Annotations.WelcomeMessage"

$current = Get-AdvancedSetting -Entity $ESXihost -Name $paramName
Write-Host "Current Weclome message:"  $current.Value

# Set the advanced parameter
Get-AdvancedSetting -Entity $ESXihost -Name $paramName | Set-AdvancedSetting -Value $WelcomeMessage -Confirm:$false

# Verify the change
$updatedSetting = Get-AdvancedSetting -Entity $ESXihost -Name $paramName
Write-Output "New $paramName value on $ESXihost : $($updatedSetting.Value)"

}
How to Run It
1. Dot-source the script (so the function is recognized):
On Windows:
. .\set_welcome_message.ps1
On Mac/Linux:
. ./set_welcome_message.ps1
2. Execute the function:
Set-WelcomeMessage -Hostname "ESXi.example.com" -WelcomeMessage "Welcome to my ESXi host!"
3. That’s it! Now when you check the DCUI over iDRAC/IPMI/iLO etc.. or on directly on console screen, you’ll see your brand-new custom text.
Customizing your ESXi’s welcome message is quick, easy, and surprisingly fun. Whether you’re adding a helpful notice or just a silly greeting, a personal touch goes a long way. Give it a try, and see if your team notices!
Intel NUC is the best piece of HW for HOME mini-LAB. But once you start grow you need more network bandwith. And one pNIC is not enough. After few sec of googling I find great page DevTTY. Where is a lot of information about “supported” USB NIC for your Intel NUC. I choose TP-LINK UE300 because I had a couple of TP-LINK (3210, 5426) switches and they are doing great job.
So I ordered TP-LINK UE300 USB 3.0 network card. Once it was delivered to me, I connected it to the NUC. Then download the driver from DevTTY and upload it to one of my datastore. No maintenance, reboot is needed. The only thing you need to do is to change the “Host Image Profile Acceptance Level” to “Community supported”.
Then just log in to the ESXi console and install VIB file with command: